Published
✅✅ BEST Cheap Lenses for the Canon 77D:
✅✅ Canon 77D on Amazon:
✅✅ My Canon 77D Full Review:
✅✅ Canon 77D Photos:
Canon 77D Tutorial - Buttons, Menus & Dials for beginners.
So let’s take a look at the buttons and dials on your brand new 77D.
Now at first it can seem a little bit complicated using a DSLR as there’s so many buttons on the camera, but once you get to use it a bit more, it becomes really familiar using them all.
Now to turn the camera on, once you’ve got your battery in, all you need to do is flick the button on the left here the on switch and you’ll see that the back LCD screen will come on.
Let’s now take a look at the dial on the top of your top of your camera here.
Most likely when you get your 77D it’ll be in the green Automatic mode. Now if this is your first time using a DSLR, this is a totally fine setting to use as the camera will adjust all of the settings for you.
If you twist the dial up the top here, you’ll see that we have a number of other settings, such as Scene, Flash and effects. If you want you can play around with these settings as well but once you start to get the hang of your camera you’ll probably want to use the manual modes over here.
Now there are a tonne of great videos on youtube if you’d like to learn more about these, once your ready to go fully manual.
Now moving to the front of the camera we have a few buttons which you will use a lot. Starting at the very front we have the shutter button or the button that you’ll press to take photos.
Firstly you can half press the shutter button and this will allow you to autofocus on your subject, then you’ll hear a beep and then with a full press this will take the photo.
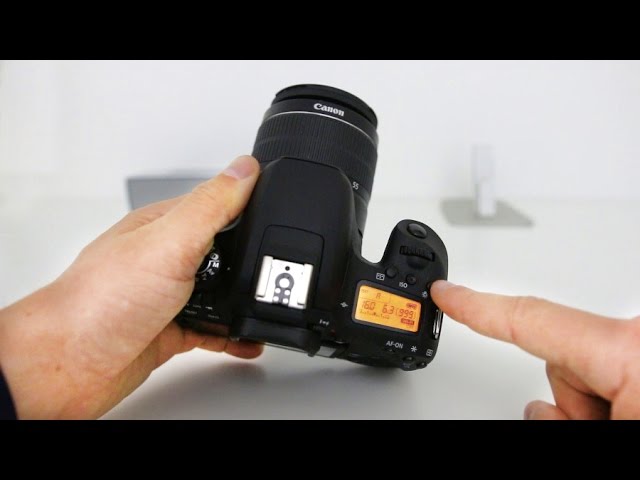
Next up we’ve got our ISO button, focus mode button and your top lcd light button .
Moving back we our main dial.
Speaking about that, you’ll use this dial quite a lot. With this dial you’ll be able to adjust different settings such as your iso, aperture and shutter speed.
Just below, we have your top LCD Screen which allow you to see most of your settings without having to look through the viewfinder or on the back lcd.
Let’s now take a look at some of the buttons on the back of the camera.
The red button at the front here will allow you to record videos. To record a video, firstly press make sure your in video mode using the switch on the left here then press the red button at the top and you’re good to go.
Below here we have our q button. This button is great as it allows you to change different settings once you press it down.
Below it on the right we have the wifi button which allows you to quickly set up wifi so you can transfer your photos over the air.
In the middle here we have your playback button. After you’ve taken a photo or a video, you can hit this button to take a look at what you’ve taken. To move to the next photo, all you need to do is go right or left on the dial here.
Now if you’re not sure if your photo is sharp or not, you can press this little zoom button right here. The more you press it, the more zoomed in you get. To zoom out, all you need to do is press the button below.
If you’re not happy with the shot, you can simply delete by pressing the trash can button on the right here.
Now another button you’ll likely use a lot is the menu button. Once you press this it’ll take you into the menu system where you can change a number of different settings, but I’ll make another vide on that soon.
Next to it we’ve got the info button at the bottom here, which allows you to change some of the information displayed on your lcd screen.
And on the bottom right here we have our secondary dial. With this you can qucikly change settings such as white balance, autofocus mode and set a timer.
Giveaway Entry Details, Official Rules & Privacy Notice:
✅✅ Canon 77D on Amazon:
✅✅ My Canon 77D Full Review:
✅✅ Canon 77D Photos:
Canon 77D Tutorial - Buttons, Menus & Dials for beginners.
So let’s take a look at the buttons and dials on your brand new 77D.
Now at first it can seem a little bit complicated using a DSLR as there’s so many buttons on the camera, but once you get to use it a bit more, it becomes really familiar using them all.
Now to turn the camera on, once you’ve got your battery in, all you need to do is flick the button on the left here the on switch and you’ll see that the back LCD screen will come on.
Let’s now take a look at the dial on the top of your top of your camera here.
Most likely when you get your 77D it’ll be in the green Automatic mode. Now if this is your first time using a DSLR, this is a totally fine setting to use as the camera will adjust all of the settings for you.
If you twist the dial up the top here, you’ll see that we have a number of other settings, such as Scene, Flash and effects. If you want you can play around with these settings as well but once you start to get the hang of your camera you’ll probably want to use the manual modes over here.
Now there are a tonne of great videos on youtube if you’d like to learn more about these, once your ready to go fully manual.
Now moving to the front of the camera we have a few buttons which you will use a lot. Starting at the very front we have the shutter button or the button that you’ll press to take photos.
Firstly you can half press the shutter button and this will allow you to autofocus on your subject, then you’ll hear a beep and then with a full press this will take the photo.
Next up we’ve got our ISO button, focus mode button and your top lcd light button .
Moving back we our main dial.
Speaking about that, you’ll use this dial quite a lot. With this dial you’ll be able to adjust different settings such as your iso, aperture and shutter speed.
Just below, we have your top LCD Screen which allow you to see most of your settings without having to look through the viewfinder or on the back lcd.
Let’s now take a look at some of the buttons on the back of the camera.
The red button at the front here will allow you to record videos. To record a video, firstly press make sure your in video mode using the switch on the left here then press the red button at the top and you’re good to go.
Below here we have our q button. This button is great as it allows you to change different settings once you press it down.
Below it on the right we have the wifi button which allows you to quickly set up wifi so you can transfer your photos over the air.
In the middle here we have your playback button. After you’ve taken a photo or a video, you can hit this button to take a look at what you’ve taken. To move to the next photo, all you need to do is go right or left on the dial here.
Now if you’re not sure if your photo is sharp or not, you can press this little zoom button right here. The more you press it, the more zoomed in you get. To zoom out, all you need to do is press the button below.
If you’re not happy with the shot, you can simply delete by pressing the trash can button on the right here.
Now another button you’ll likely use a lot is the menu button. Once you press this it’ll take you into the menu system where you can change a number of different settings, but I’ll make another vide on that soon.
Next to it we’ve got the info button at the bottom here, which allows you to change some of the information displayed on your lcd screen.
And on the bottom right here we have our secondary dial. With this you can qucikly change settings such as white balance, autofocus mode and set a timer.
Giveaway Entry Details, Official Rules & Privacy Notice:
- Category
- Photography
Sign in or sign up to post comments.
Be the first to comment
Up Next
-
05:23

Canon 77D vs Canon 80D! Should you buy the 80D or 77D?
-
09:44
7 Gmail Settings Every User Should Know! (2019 Tutorial)
-
03:30
Canon SL2 (200D) Tutorial - Mode Dial Settings Guide
-
08:08
7 Zoom Settings Every User Should Know! (2020 Tutorial)
-
18:24
Canon M50 vs Canon SL2 (200D) - Which is the BEST beginner camera 2019?
-
06:01
Canon 77d vs Canon 70d - Best DSLR Under $1000?
-
03:51
Canon 77d Unboxing & Review of What You Get!
-
03:24
Canon 77D (9000D) vs 80D - ALL the reason to get the Canon 80D
-
11:30
Should You Buy The Canon EOS 77D camera?
-
00:56
Canon 77D & Nikon D5600 Subscriber Giveaway!
-
05:05
Canon T7i (800D) Tutorial - Beginner’s User Guide to the Buttons, Dials & Settings
-
02:47
Canon 77D Tutorial - How to set up WiFi
-
07:05
Canon SL2 (200D) Tutorial - Beginner’s User Guide to the Buttons, Dials & Settings
-
05:21
Canon 77D Tutorial - Best Settings For High Quality DSLR Video!
-
03:52
Best Lenses for the Canon 77D!
-
04:37
Canon SL2 (200D) vs Canon SL1 (100D) - What is the Best Canon Beginner DSLR?
-
05:43
Canon T7i (800d) vs Canon 77D - Head to Head Shootout!
-
25:26
Watch This Before You Buy The Canon 77D
-
12:52
Canon 77D - My First Video Footage
-
04:11
Nikon D7500! (vs Nikon D500, D7200, D5600 & Canon 77D, 80D, 7D)
-
04:01
Canon 77D Tutorial For Beginners - Users Guide Manual
-
08:26
Canon 77D Review! The BEST DSLR Under $1000!